Setting up Apache Hadoop cluster in AWS EC2
Apache Hadoop is a distributed software framework with which we can process large data sets across distributed clusters of computers. Hadoop scales up from a single machine to thousands of machines. Setting up the Apache Hadoop cluster in AWS EC2 is a relatively complicated task. We will follow some simple steps to set up the cluster quickly.
There are four main modules in the Hadoop framework. They are:
- Hadoop Common: Common utility functions that are used in other Hadoop modules
- HDFS: Hadoop Distributed File system
- Hadoop YARN: Job scheduling and cluster resource management
- Hadoop MapReduce: Parallel processing of large data sets using YARN
Prerequisite
- AWS Account (Academy and Sandbox also work)
- Basic familiarity with Linux terminal
- SSH client installed on a personal computer
EC2 Instance setup
We need to set up an EC2 instance to setup the Hadoop cluster. AWS EC2 provides virtual servers on the cloud. We will create a server and install Java and Hadoop on the server which will be our Name Node, and then clone it later to create three new instances for data nodes.
Create EC2 instance
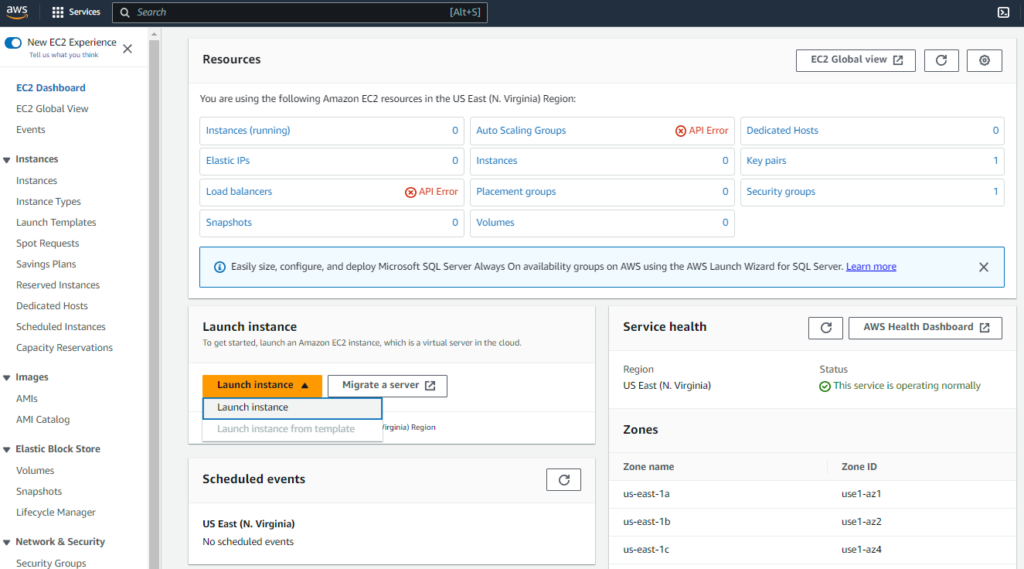
Go to the AWS console and search “ec2”. Then, click on EC2

Click on “Launch Instance”
Configure EC2 Instance creation
Fill up or choose the following data:
Name: “Name Node”
Amazon Machine Image: Ubuntu 22.04 LTS, SSD Volume Type
Architecture: 64-bit (x86)
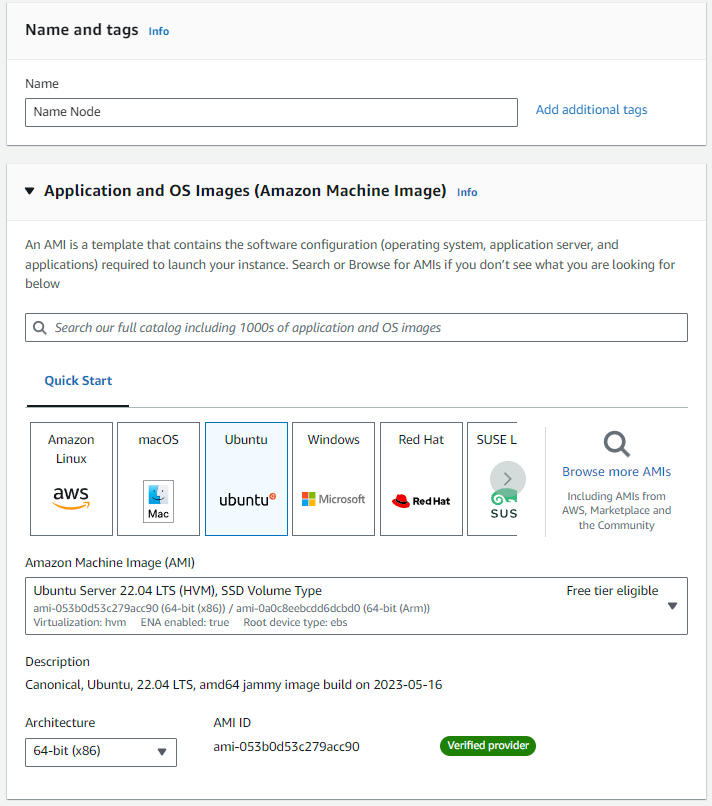
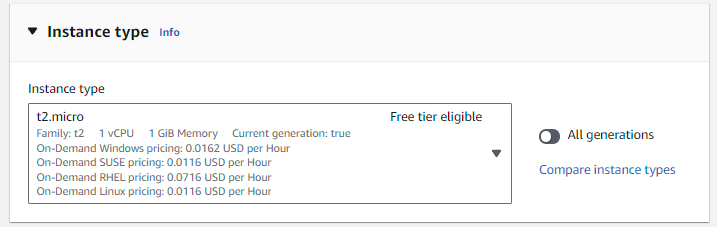
Instance type: t2.micro
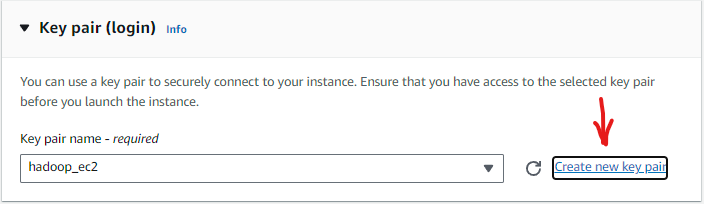
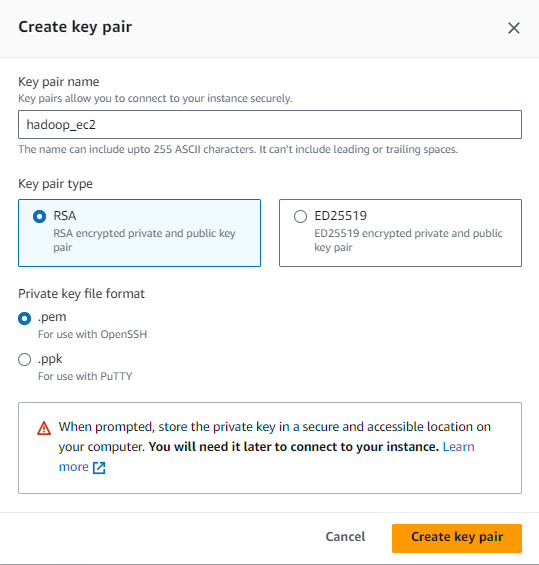
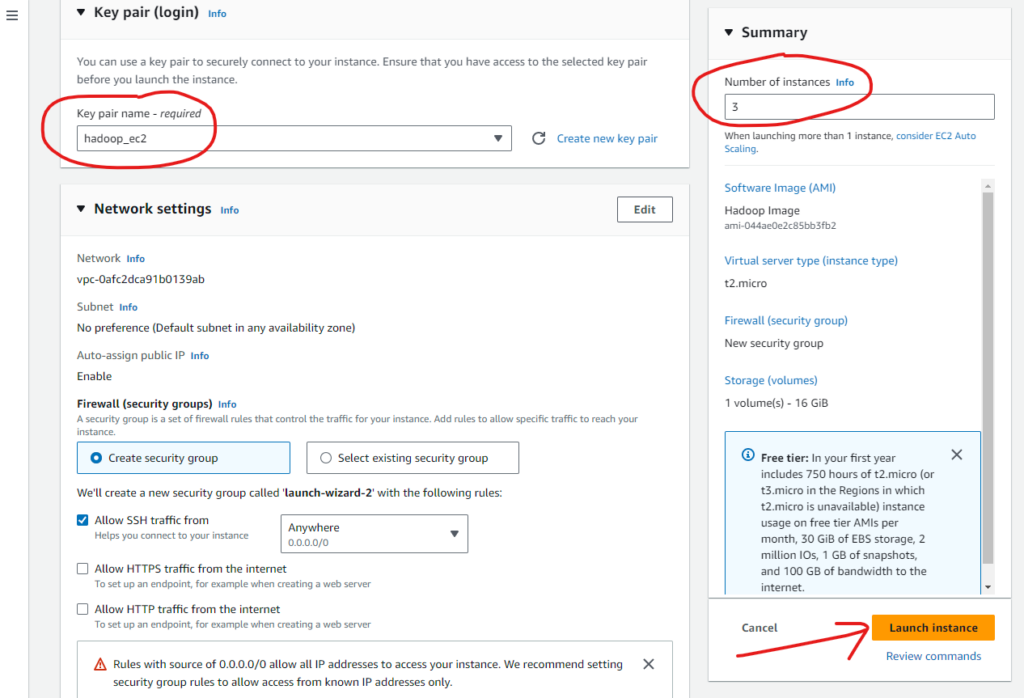
Create an RSA key pair for ssh login: In the section “Key pair (login)” click on “create a new key pair” and fill it up as shown below to create an RSA private and public key pair. It will download the public key, which you should keep in a safe folder.
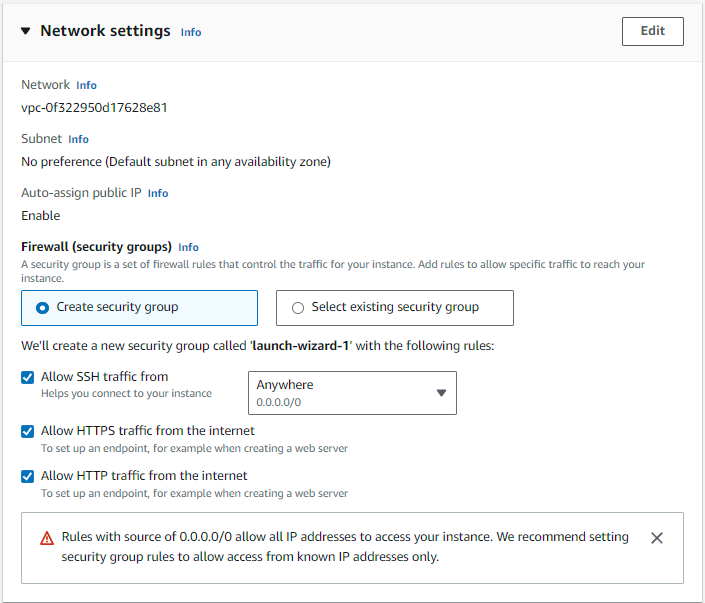
Network settings
Tick the checkmark on all three options under the Firewall security group.
- Allow SSH traffic from: Anywhere
- Allow HTTPS traffic from the internet
- Allow HTTP traffic from the internet
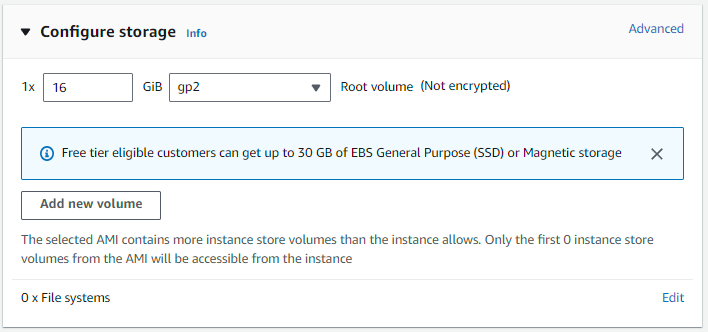
Configure storage
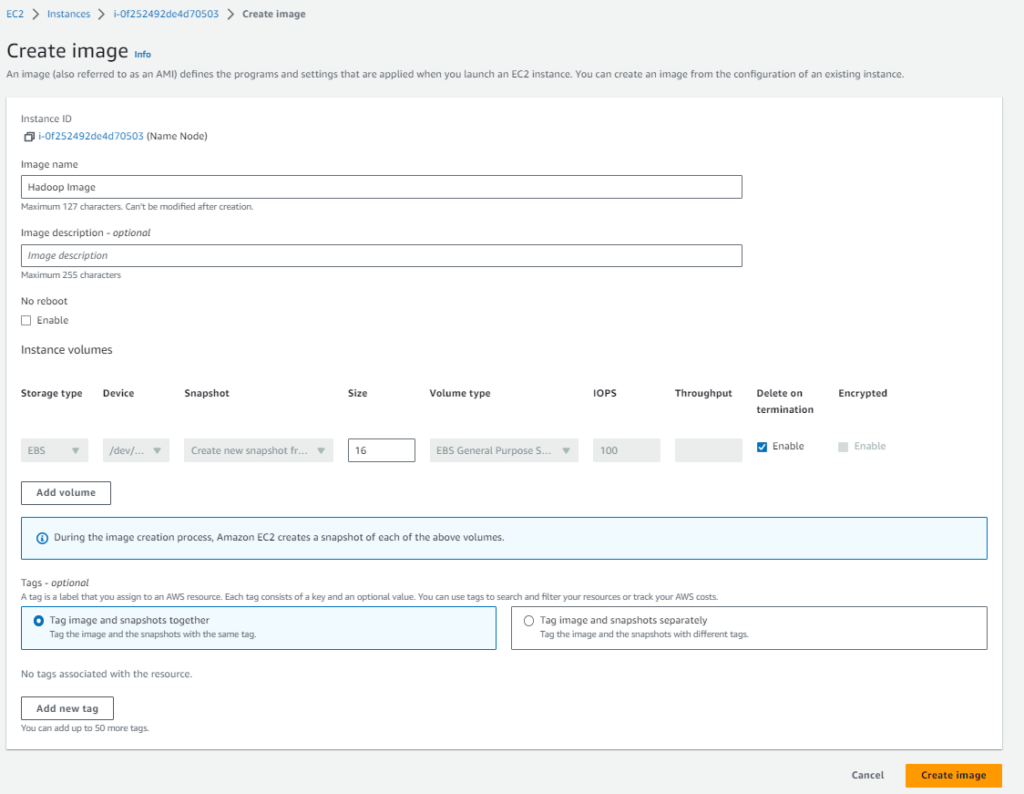
8 GB is fine for testing purpose; but let’s choose 16 GB for extra storage. You can choose upto 30 GB in free tier.
Finally, click on the “Launch Instance” orange button.
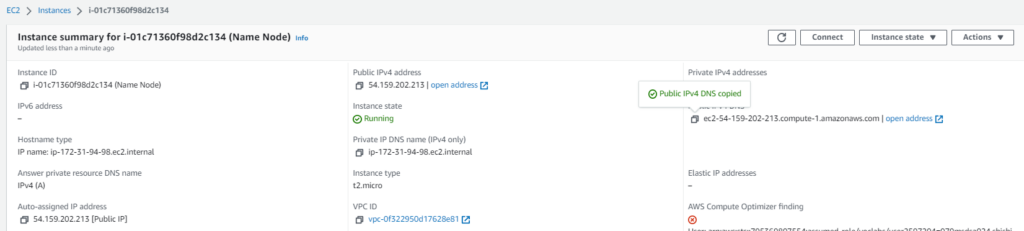
In the EC2 > instances section, we can see that the instance has been launched and is in the “running” state. If it shows “pending”, wait for some time.

Installing JAVA and Hadoop
SSH access to the server
We need to enter into the server via ssh(secure shell) in order to install Java and Hadoop there. Follow the following steps for ssh access.
Get the public domain name
Click on the “Instance ID” and copy the “Public IPv4 DNS” as shown below.

ssh into the server
On your personal computer, type the following commands to enter the server
cd folder_name
chmod 400 hadoop_ec2.pem
ssh -i hadoop_ec2.pem ubuntu@ec2-54-159-202-213.compute-1.amazonaws.com
These commands do the following things:
- Go to the folder where you stored your public key earlier (in my case, it is “hadoop_test”)
- Change permission of the file to be read by only the current user (400 means read-only for the current user, and no access for other users)
- Enter into the server via ssh (Replace the public DNS of the server in the last command)
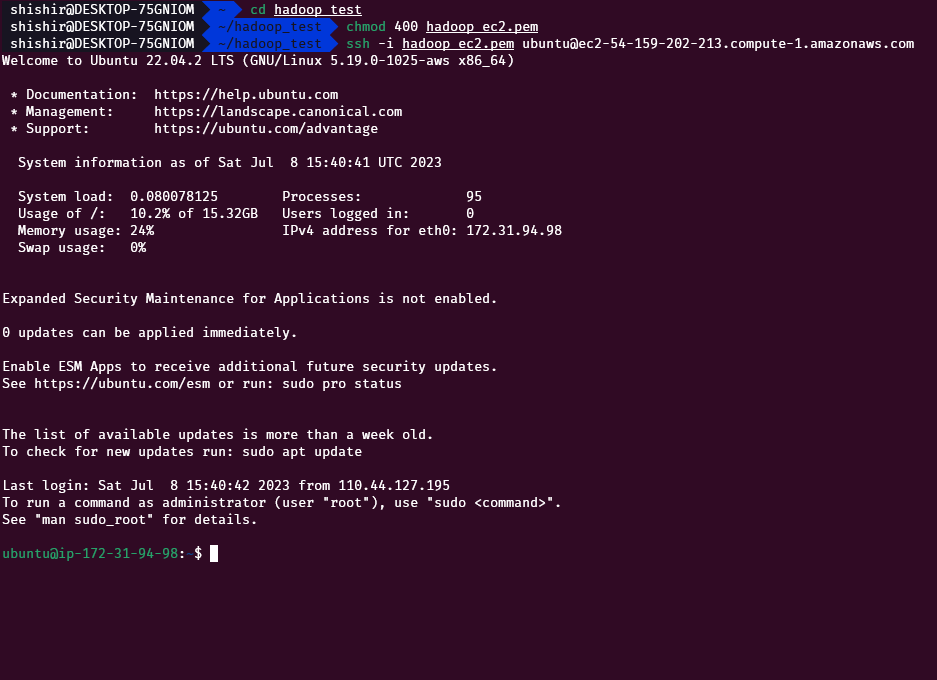
We have now entered the server via ssh. The commands we enter here will run in the EC2 instance we created earlier.
Update Ubuntu on the server
Type the following command to update the server
sudo apt update -y && sudo apt upgrade -y;If any confirmation page is shown, press Enter on the keyboard to accept the changes.
After the update has completed, go to the AWS console > EC2 > instances, click on “Instance State” and choose Reboot

After rebooting the instance, you will again have to ssh into the server by entering the following command (up arrow on the keyboard should bring the previous command). You may need to wait for a bit to allow the reboot to complete.
ssh -i hadoop_ec2.pem ubuntu@ec2-54-159-202-213.compute-1.amazonaws.comInstall Java
We now install Java 8 on the server by using the package “openjdk-8-jdk-headless”. Run the following command to install Java.
sudo apt -y install openjdk-8-jdk-headlessIn the server, create a directory called “server” and go to that folder
cd
mkdir server
cd server
Install Apache Hadoop
Let’s install Hadoop 2.7.3 on the server. Copy the download link from the Apache website and use that link in the following command.
wget https://archive.apache.org/dist/hadoop/common/hadoop-2.7.3/hadoop-2.7.3.tar.gz
tar xvzf hadoop-2.7.3.tar.gz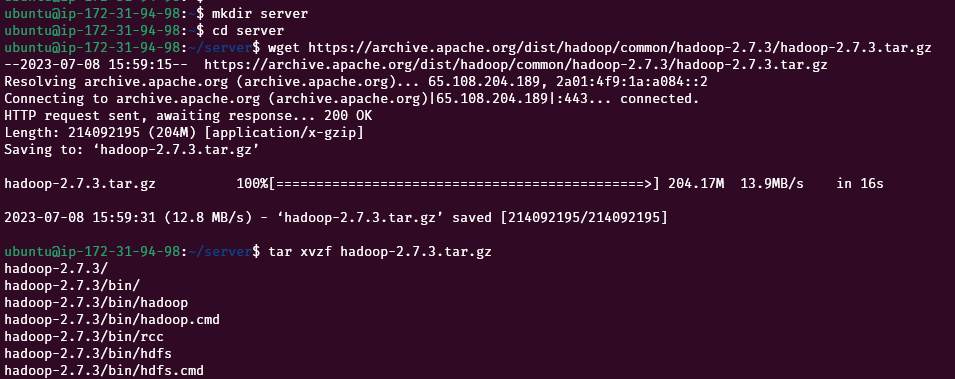
Setup JAVA_HOME in the hadoop-env
Edit the file ~/server/hadoop-2.7.3/etc/hadoop/hadoop-env.sh using nano or vim.
nano ~/server/hadoop-2.7.3/etc/hadoop/hadoop-env.shIn the editor, replace this line
export JAVA_HOME=${JAVA_HOME}with the following line:
export JAVA_HOME=/usr/lib/jvm/java-8-openjdk-amd64Save and Exit
Setup core site configuration
Now edit the file ~/server/hadoop-2.7.3/etc/hadoop/core-site.xml
nano ~/server/hadoop-2.7.3/etc/hadoop/core-site.xmlReplace this block
<configuration>
</configuration>
with the following code block:
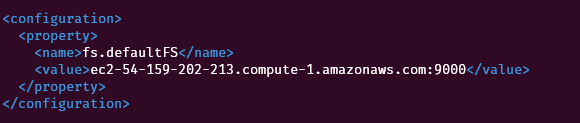
<configuration>
  <property>
    <name>fs.defaultFS</name>
    <value><nnode>:9000</value>
  </property>
</configuration>
Replace the “nnode” with the public DNS of the EC2 instance as shown below:
Create Data Directory
We are going to create one Name Node, and three Data Nodes. In each of these four nodes, HDFS requires a data directory.
Enter the following code to create a data directory and change ownership to the user “ubuntu”.
sudo mkdir -p /usr/local/hadoop/hdfs/data
sudo chown -R ubuntu:ubuntu /usr/local/hadoop/hdfs
Creating Data Nodes
We have now created Name Node and installed the required packages that are common to both the name node and data nodes. So, we can clone this instance to create three data nodes. By doing this, we won’t have to repeat the above steps for the data nodes; Java and Hadoop will already be available in the data nodes.
Architecture diagram
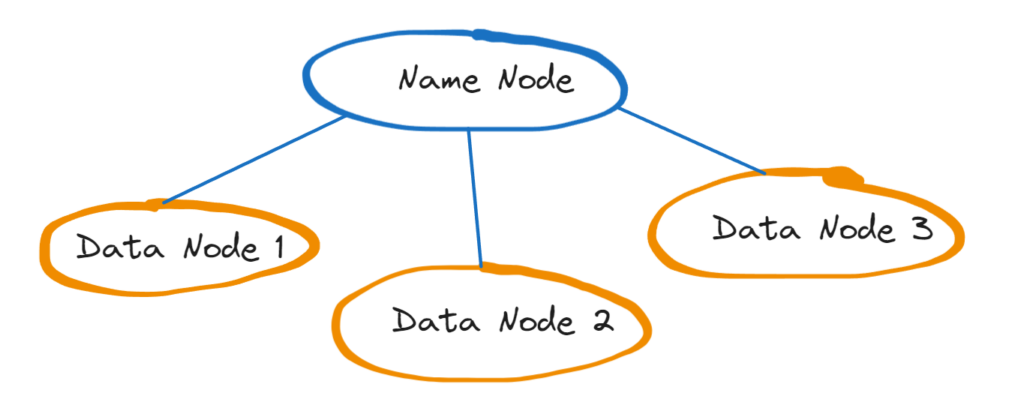
Create an Image from the instance
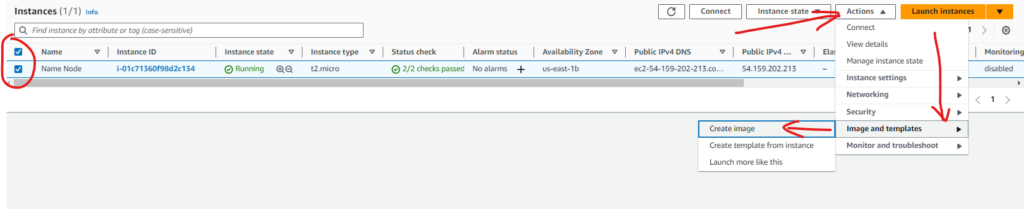
In the AWS EC2 > instances, select the name node instance, and go to “Actions”
Click on “Image and templates” and then “Create image”
Enter the image name as “Hadoop Image”
Create three new instances from the created image
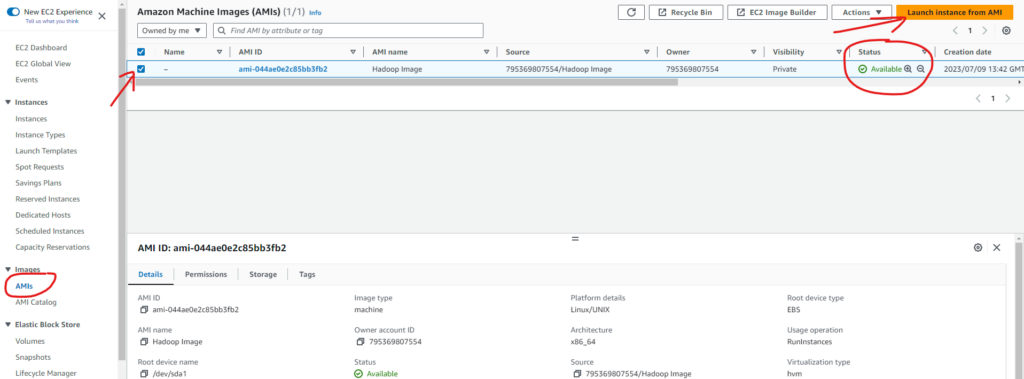
Go to the “Images > AMIs” and wait for the image creation to be completed (look at the “Status” column)
Then launch three new instances from the previously created image.
Set the value of the “Name” to “dnode”
Set “Number of instances” to 3 and click on “Launch instance”
Note 1: Make sure that key pair name is the same value that we created when launching the first EC2 instance.
Click on “Launch instance”
Now, three new data node instances have been created.

Note down the public DNS of newly created data nodes. We use these DNS to enter into the nodes via ssh.
Setting up passwordless SSH between the servers
We need to create a passwordless ssh connection between the name node and the data nodes so that the name node can communicate with the data nodes in order to manage the distributed system.
Name Node
SSH into the name node, and run the following command:
ssh-keygenUse default values and press Enter. It will create two new files “id_rsa” and “id_rsa.pub” inside the “/home/ubuntu/.ssh/” directory.
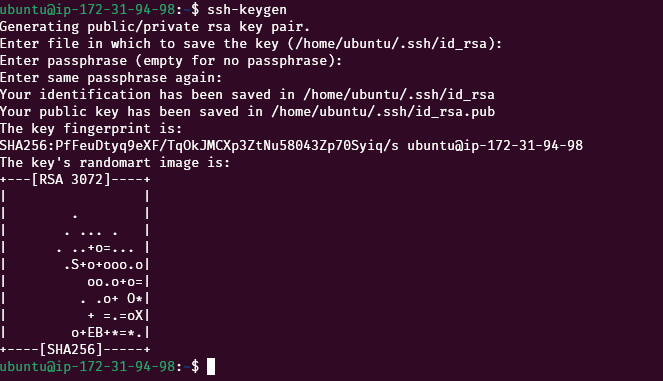
The ssh private is located at /home/ubuntu/.ssh/id_rsa and the public key is located at /home/ubuntu/.ssh/id_rsa.pub. We need to copy the public key value and use it in the data nodes.
We also need to put this public key value in the authorized_keys file of the name node.
cat /home/ubuntu/.ssh/id_rsa.pub >> /home/ubuntu/.ssh/authorized_keysNow copy the content of id_rsa.pub file to copy it into the data nodes
cat /home/ubuntu/.ssh/id_rsa.pub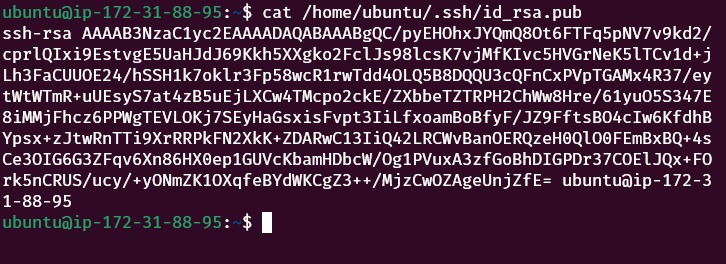
Copy this value
Data Nodes
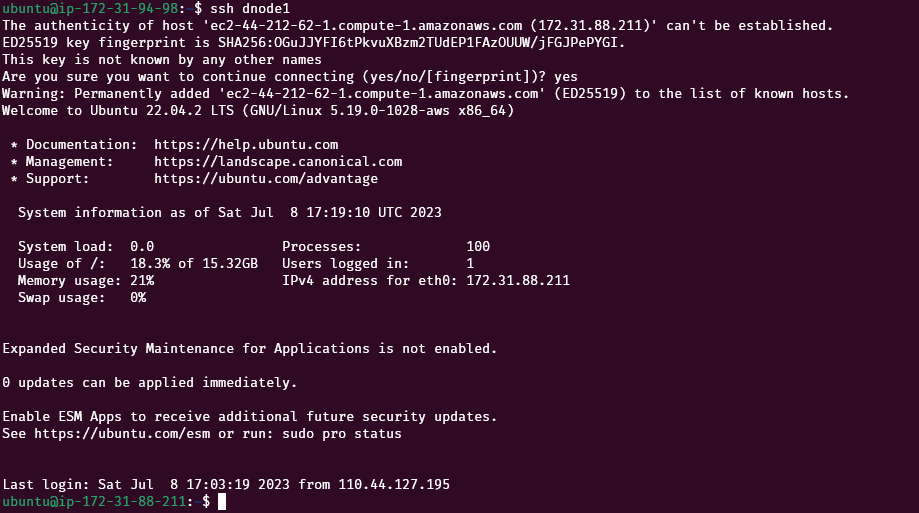
Now ssh into each of the data nodes using public DNS like this:
ssh -i hadoop_ec2.pem ubuntu@ec2-54-164-170-249.compute-1.amazonaws.comIn the data node, there is a file called authorized_keys in the /home/ubuntu/.ssh/ directory. Edit this file and append the value of id_rsa.pub file copied previously.
nano /home/ubuntu/.ssh/authorized_keysRepeat this step for each data node
Setup ssh config in name node
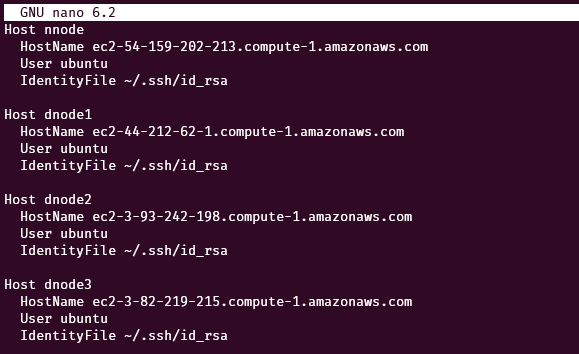
Configurations for ssh can be stored in the file /home/ubuntu/.ssh/config . Copy the following content into that file of the name node. Replace the nnode and dnode1,2,3 with the public DNS of the respective servers.
nano /home/ubuntu/.ssh/configData: In the file editor, put the following data by replacing the nnode, dnode1, dnode2, and dnode3 values with respective public DNS.
Host nnode
  HostName <nnode>
  User ubuntu
  IdentityFile ~/.ssh/id_rsa

Host dnode1
  HostName <dnode1>
  User ubuntu
  IdentityFile ~/.ssh/id_rsa

Host dnode2
  HostName <dnode2>
  User ubuntu
  IdentityFile ~/.ssh/id_rsa

Host dnode3
  HostName <dnode3>
  User ubuntu
  IdentityFile ~/.ssh/id_rsa
like this:
Now, we need to verify if our ssh configuration works. Enter the following commands one by one in the name node:
ssh nnodeType “yes” if prompted for confirmation.
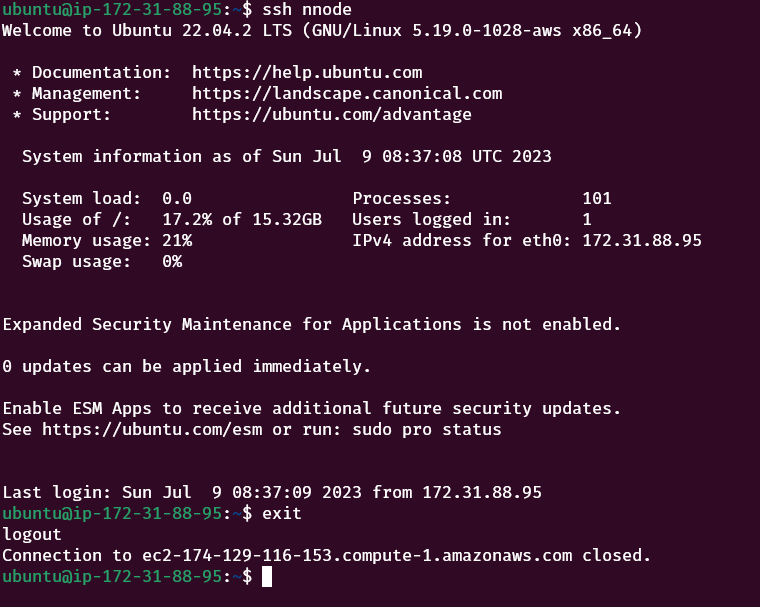
Type exit to get back to the name node.
exitNow test each of the data nodes
Repeat this step for all the nodes namely: nnode, dnode1, dnode2, dnode3
Configuring Hadoop on Name Node
HDFS Properties
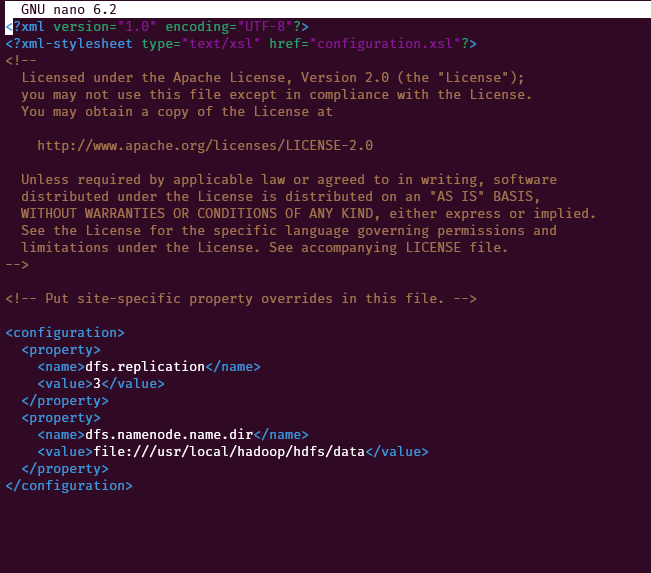
On the name node, edit this file: ~/server/hadoop-2.7.3/etc/hadoop/hdfs-site.xml
nano ~/server/hadoop-2.7.3/etc/hadoop/hdfs-site.xmlReplace this
<configuration>
</configuration>
with the following code
<configuration>
  <property>
    <name>dfs.replication</name>
    <value>3</value>
  </property>
  <property>
    <name>dfs.namenode.name.dir</name>
    <value>file:///usr/local/hadoop/hdfs/data</value>
  </property>
</configuration>
MapReduce properties
On the name node, we will use a template for mapreduce configuration. Copy the file (~/server/hadoop-2.7.3/etc/hadoop/mapred-site.xml.template) to (~/server/hadoop-2.7.3/etc/hadoop/mapred-site.xml)
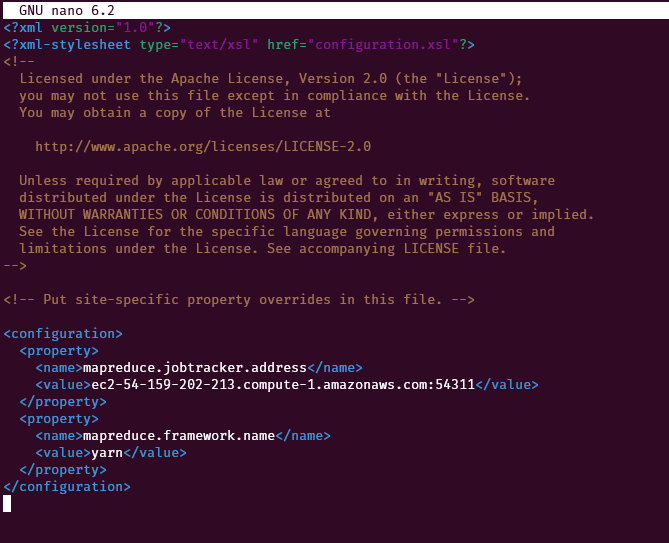
cp ~/server/hadoop-2.7.3/etc/hadoop/mapred-site.xml.template ~/server/hadoop-2.7.3/etc/hadoop/mapred-site.xmlNow edit the copied file ~/server/hadoop-2.7.3/etc/hadoop/mapred-site.xml
nano ~/server/hadoop-2.7.3/etc/hadoop/mapred-site.xmlReplace this
<configuration>

</configuration>
with the following code
<configuration>
  <property>
    <name>mapreduce.jobtracker.address</name>
    <value><nnode>:54311</value>
  </property>
  <property>
    <name>mapreduce.framework.name</name>
    <value>yarn</value>
  </property>
</configuration>
Note: Replace the <nnode> with the public DNS of the name node.
YARN properties
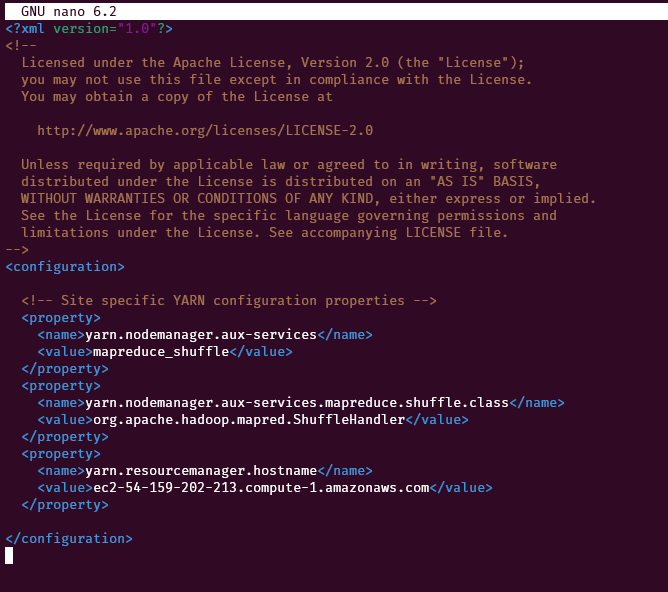
On the name node, edit the file ~/server/hadoop-2.7.3/etc/hadoop/yarn-site.xml
nano ~/server/hadoop-2.7.3/etc/hadoop/yarn-site.xmlReplace this
<configuration>

<!-- Site specific YARN configuration properties -->

</configuration>
with the following code
<configuration>

  <!-- Site specific YARN configuration properties -->
  <property>
    <name>yarn.nodemanager.aux-services</name>
    <value>mapreduce_shuffle</value>
  </property>
  <property>
    <name>yarn.nodemanager.aux-services.mapreduce.shuffle.class</name>
    <value>org.apache.hadoop.mapred.ShuffleHandler</value>
  </property>
  <property>
    <name>yarn.resourcemanager.hostname</name>
    <value><nnode></value>
  </property>

</configuration>
Note: Replace the <nnode> with the public DNS of the name node.
Setup master and slaves
On the name node, create two new files “~/server/hadoop-2.7.3/etc/hadoop/masters” and “~/server/hadoop-2.7.3/etc/hadoop/slaves” for master and slave nodes respectively. Then put the public DNS of the master(name node) and the slaves(data nodes) in the respective files.
nano ~/server/hadoop-2.7.3/etc/hadoop/mastersnano ~/server/hadoop-2.7.3/etc/hadoop/slaves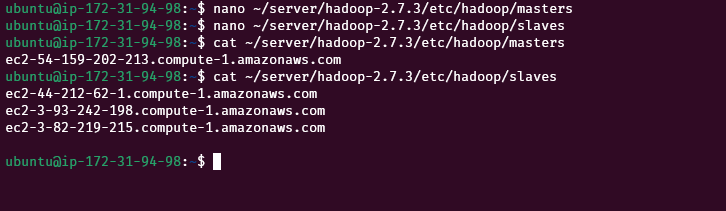
Configure Data Nodes
We also need to configure data nodes. On each of the data nodes, edit the file ~/server/hadoop-2.7.3/etc/hadoop/hdfs-site.xml
nano ~/server/hadoop-2.7.3/etc/hadoop/hdfs-site.xmlreplace this
<configuration>
</configuration>
with the following code
<configuration>

  <property>
    <name>dfs.replication</name>
    <value>3</value>
  </property>
  <property>
    <name>dfs.datanode.data.dir</name>
    <value>file:///usr/local/hadoop/hdfs/data</value>
  </property>
</configuration>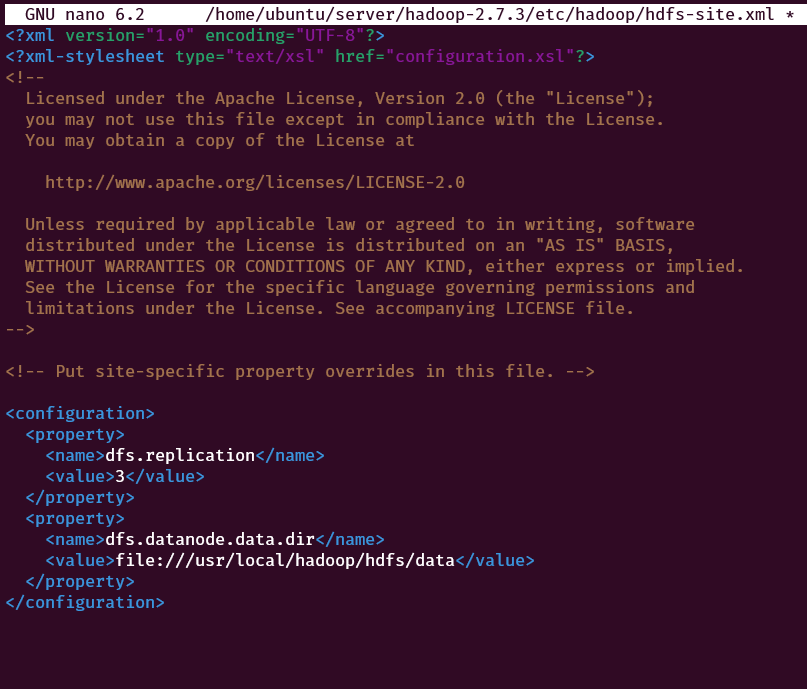
Starting the Hadoop cluster
On the name node, format the HDFS data
~/server/hadoop-2.7.3/bin/hdfs namenode -format
Start the Hadoop Cluster by starting dfs and yarn
Start dfs
~/server/hadoop-2.7.3/sbin/start-dfs.shStart YARN
~/server/hadoop-2.7.3/sbin/start-yarn.shStart history server
~/server/hadoop-2.7.3/sbin/mr-jobhistory-daemon.sh start historyserverOutput:

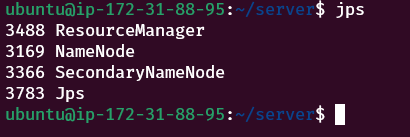
Check for daemons using jps
jpsThe above command should show the following four processes. If any of the following is missing, then you might have missed some steps during the setup process.
- ResourceManager
- NameNode
- SecondaryNameNode
- Jps
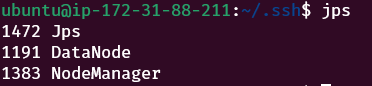
Running jps on the data node
On each of the data nodes, the following three processes should be running.
Checking the Web UI
If everything has been set up correctly, the Web UI shows the Hadoop Cluster information at the location <nnode>:50070 (e.g. ec2-174-129-116-153.compute-1.amazonaws.com:50070)
The following screenshot shows the overview of the Hadoop cluster. We can see that “Configured Capacity” is around 45 GB which is the combined storage capacity of three data nodes.
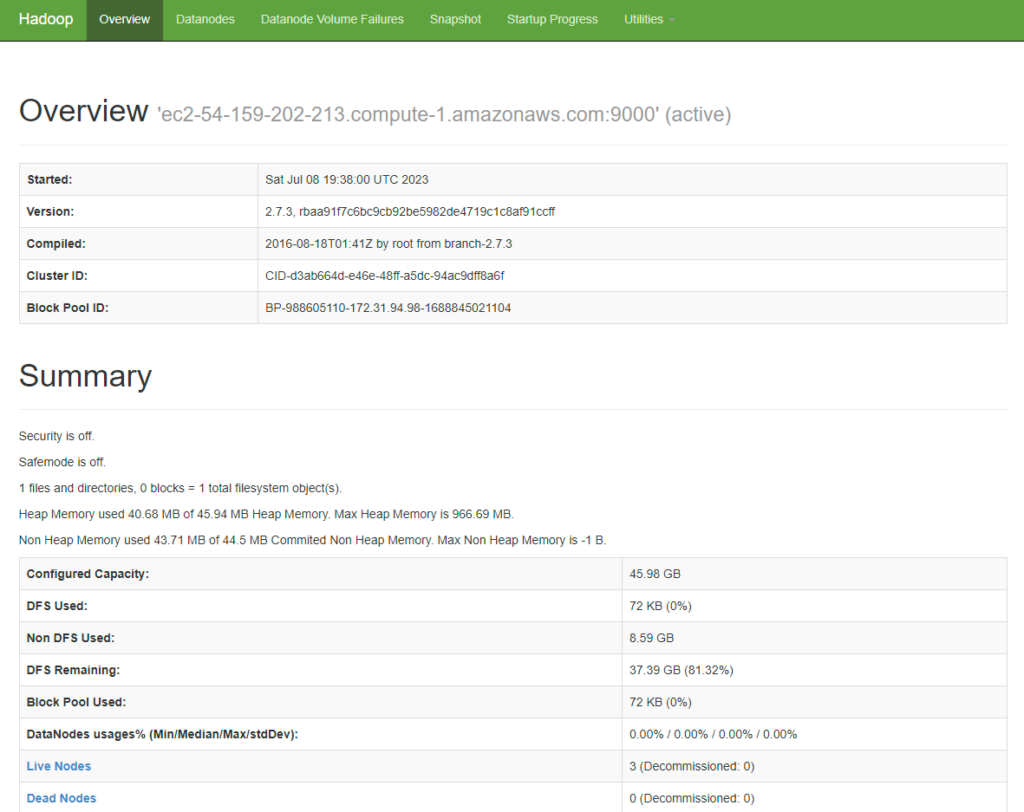
Go to the Datanodes tab to view the information of each data node.

Troubleshooting
Problem 1: Web UI not accessible at <nnode>:50070
If the Web UI is not showing up at the mentioned location, then most probably the name node instance doesn’t allow the TCP connection on the public domain in the security group. So, we need to edit the security group.
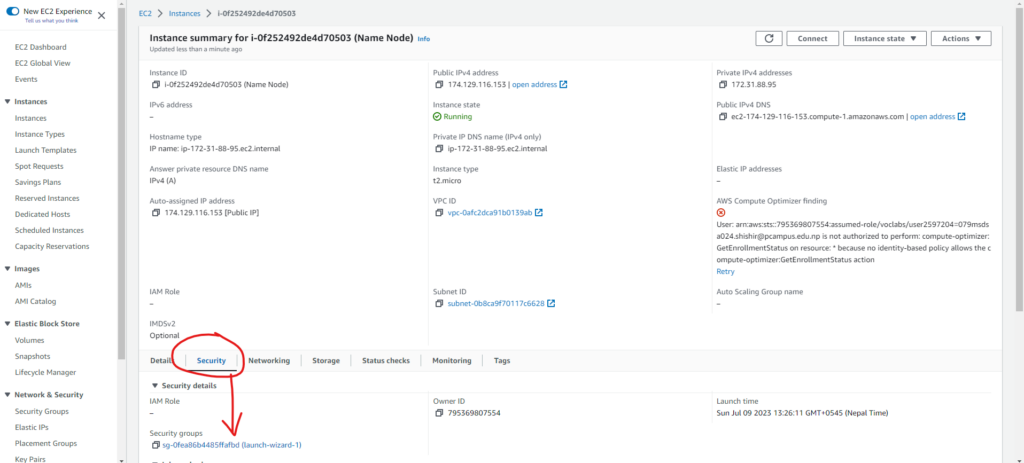
To fix this, go to the name node instance

Then go the the security group
After opening the security group, we can edit the inbound rules.
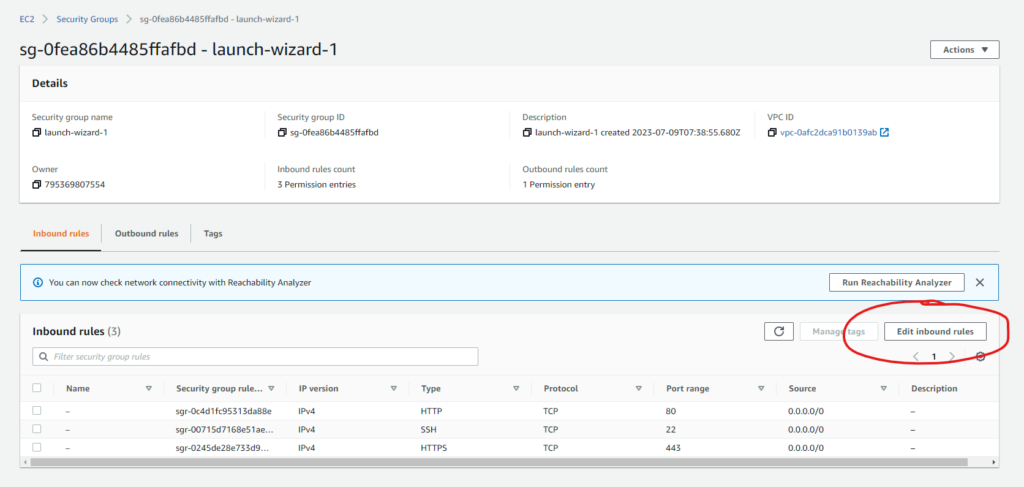
Then Add a new rule with the values as shown below:
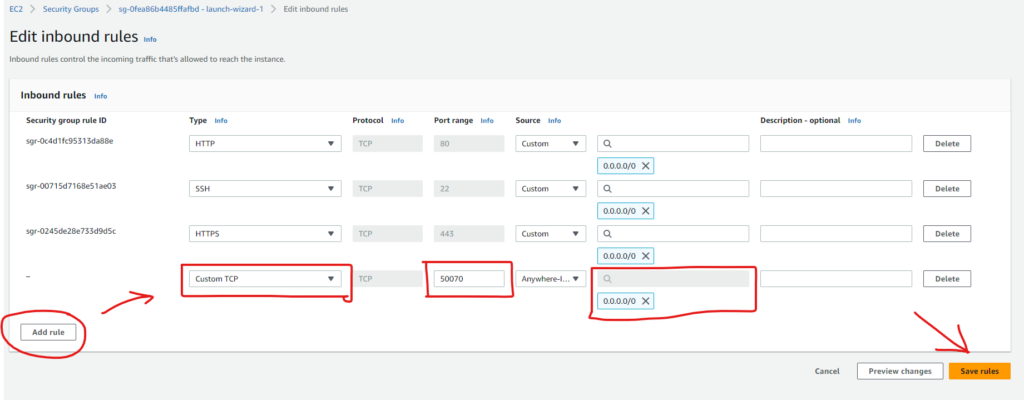
This allows the port 50070 to be accessible from the web.
Problem 2: Data Nodes not being shown in the web UI
This issue arises if the data nodes cannot access the HDFS of the name node.
First of all, run the jps command on the data nodes to check if the “DataNode” is running. If the “DataNode” is not showing up, then you have configured the cluster incorrectly.
If the “DataNode” is running in the data nodes, then these data nodes are not able to access the 9000 port of the name node which is the port for HDFS. The reason might be that the name node and the data nodes are in separate security groups.
So, we need to allow this port of the name node to be accessible from the data nodes by editing the security group of the data nodes.
Note the security group of the data node
First of all, we need to note down the security group of the data node.
Go to one of the data nodes
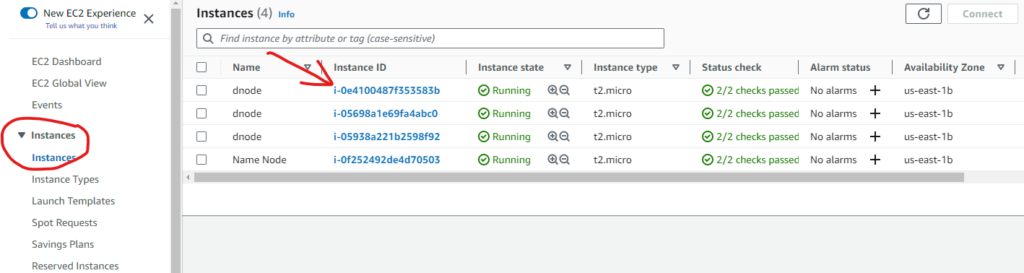
And, note down the security group name of the data node
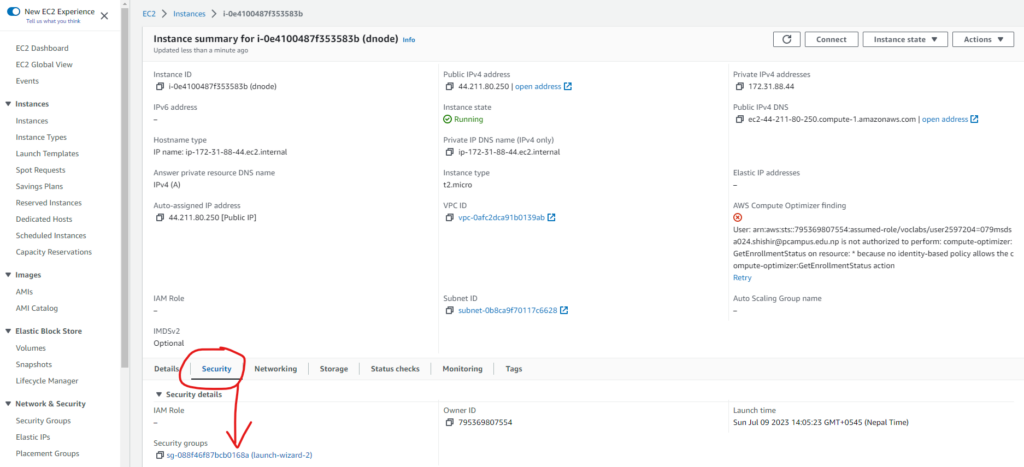
Here, the security group of the data node is “launch-wizard-2”
Now we need to edit the security group of the name node
Edit the security group of the name node
Go to the name node instance
Then open the security group of the name node
In the security group, click on Edit inbound rules
Then Add a new rule with the values as shown below:

Now, go to the web UI at <nnode>:50070 and see the data nodes. It might take 10 – 30 seconds to reflect the changes.
Conclusion
We have successfully set up the Hadoop cluster in the AWS EC2 with one name node and three data nodes.
For more tutorials, go to https://devpercept.com